Pages

Thursday, September 22, 2016

Gluten Free & Dairy Free Fresh Raspberry Crisp

I have been doing gratitude journal entries daily for my Gush Gratitude workshop (click here to join!)!  The other day I was so super grateful for my raspberry bushes!  They are all sorts of abundant right now and I had to do something with them!


This is very similar to this recipe... but it's sooooo good I had to share it again!

Fresh Raspberry Crisp


Filling:

 2 C fresh raspberries
1/4 C cane sugar
1 T pure maple syrup
2 T corn starch


Crumb/Crust:

 1 C GF all purpose flour blend
1 C GF oats
1/4 C almond meal
1/4 C brown sugar
1/4 C cane sugar
1/4 t sea salt
5 T SOLID coconut oil
2 T unsweetened coconut milk
2 T pure maple syrup


Preheat oven to 375 degrees. Prepare 8x8-inch baking pan with parchment paper/cooking spray.  Clean your raspberries and put them in a medium bowl.  Carefully mix in the remaining filling ingredients and set aside. 

 Sift together the flours, oats, sugars and salt. Add coconut oil and blend with fork until ingredients are well mixed. Pour in maple syrup and coconut milk. Stir until just combined and kinda crumbly.

Spread 2/3 of oat mixture into your pan and press down evenly. Pour your filling mixture over top.  Sprinkle remaining crumb mixture over the filling. Bake for about 45 minutes or until raspberries are bubbly and the crumbs are golden brown. Allow to cool in pan. Slice and serve.

Sunday, September 18, 2016

Gluten Free Body Lotion


A good beauty product post has been long overdue from me.  Sorry, friends!


I have been making a lot of my own products so that's why I haven't been sharing much with you on this front.


Fall is just around the corner and that means skin needs more love than usual.  These are some of the gluten free body lotions that I have tried and loved!


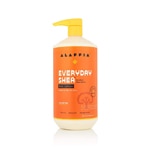
1. Everyday Shea Moisturizing Body Lotion:  This is my FAVE! I love the unscented, then I can add whatever essential oils I want for scent or mood management!  For more on how I play with oils see here.


Everyday Shea Moisturizing Body Lotion Unscented


2. Desert Essence Organics
Desert Essence Organics Nourishing Hand and Body Lotion Coconut


3.  Acure Organics:
Acure Organics Body Lotion Ultra-Hydrating Cocoa Butter + CoQ10


4.  Mineral Fusion Body Lotion:

Mineral Fusion Body Lotion Unscented


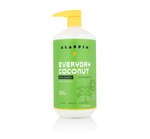
5. Alaffia Everyday Coconut Body Lotion

Alaffia Everyday Coconut Body Lotion Hydrating


6.  EO Essential Oil Products Everyone Lotion: Lavender & Aloe is my fave!
EO Essential Oil Products EveryOne Lotion Lavender and Aloe


Friday, September 16, 2016

Guided Gratitude Journal Workshop!


#gratitudejournaling has become such an important part of my #selfcareroutine! I've been wanting to share it to not only hold others up, but also hold them (and myself πŸ˜‰) accountable!  I literally can't think of a better time to start our #gratitudejournalworkshop than tonight's #harvestmooneclipse! 

Join the Facebook group or follow me on Instagram to join in the fun! 

#gushgratitude with me, friends!

Join the Facebook group here! https://www.facebook.com/groups/265001293899066/

Follow me on Instagram: @rocksolidvibes

#holistichealing #holistichealth #fillyourtankfirst #selflove #grateful #happy #blessed #rocksolidvibes #rocksolidvibestribe #blossomsunited #harvestmoon #fullmoon #lunareclipse

Thursday, September 15, 2016

Kids Pet Week Yoga


We have been celebrating Pet Week at school.


As you know I am an animal LOVER.  Some of my friends from the animal shelter that I volunteer at are coming to visit our school tomorrow and bringing some furry friends!  We have collected donations for them all week and can't wait to give them to the shelter and hear all about what they do and how to take good care of pets.


Not only have we been doing some super fun things in my classroom for pet week, but I've also been doing Pet Week Yoga with all the other classes too!


These were some of their fave poses...


1.  Dog (Down Dog) - don't forget to bark!


2. Cat (Cat Stretches)- meow away!


3.  Frog- say ribbit and jump as high as you can


4. Guinea Pig (child's pose)


5.  Pony (alternating extended table)- gallop!


6. Bird- check out the super adorable picture above!


7. Fish (shark pose)


8.  Snake (Cobra)- slither and hiss too!


9. Lizard

Happy Celiac Awareness Day!


Hey gorgeous gutsy girls!! It's celiac awareness day!

I ❤️ you all and am so glad we can learn from each other! 

Head on over to my Instagram @rocksolidvibes and feel free to repost this picture!  Tag and follow me too! 

And don't forget to hug a celiac today! 😘

#celiacawarenessday #gutsygirl #celiac #celiacdisease #glutenfree #apennyformyglutenfreethoughts

Tuesday, September 6, 2016

Garden Fresh Roasted Cherry Tomato Salsa

I make a ton of this stuff this time of year. My garden is overflowing with tomatoes and jalapenos.  Using and roasting the cherry tomatoes gives this such a sweet fruity flavor that lets you get away with throwing in a lot more heat!


Roasted cherry tomato salsa 


3 cups cherry tomatoes
1 onion
8 garlic cloves
4 jalapenos
1 T EVOO
Sea salt
Juice of one lime
1 big handful cilantro
1/4 t cumin
1/4 t cayenne pepper
1/2 t oregano 

Slice the onion in quarters.  Slice the garlic cloves and cherry tomatoes in half. Slice the jalapenos in half, remove the seeds if you want, I don't, I'm spicy like that!  Put it all cut side down on an electric griddle (I use the griddle because I don't want to use my oven when it's so damn hot out, but you can get the same results with an oven). Drizzle the oil all over the top and sprinkle with the sea salt and other seasoning.  I roast them on the griddle at about 350 for about an hour.  This seems like a long time, but it's so worth it, and you can get so much shit done while you wait and enjoy the aroma of the roasting veggies!  Once they are good and roasted throw them, along with the remaining ingredients in a blender and blend til you get your desired consistency. Then just try to wait til it cools to eat it.  Good luck with that!πŸ˜‰


Thursday, September 1, 2016

DIY Microwave Popcorn... Who knew it was soooo easy!

My vegan sour cream and onion popcorn seasoning post is on fire!  Apparently lots of gutsy girls were missing that flavor in their lives too! 


Now you need something to put it on.


As promised here is how I do microwave popcorn...


You are not going to believe how easy this is!


1.  Get a big glass bowl.
2.  Add 1/4 C popping corn
3.  Add one tablespoon of coconut oil.
4.  Top the bowl with a microwave safe plate.
5.  Microwave!  (it takes about 4 1/2 minute in my microwave)
6.  Be careful, this is going to be HOT.
7.  Dump the popcorn into a bowl that isn't so hot.  Top with whatever you like.  Drizzle a little olive oil if you want your seasoning to stick a little more.  My fave way to do this is with a generous amount of the sour cream and onion and a little extra nutritional yeast. 


That's it!!


Now grab a movie and enjoy!! :)


Gluten & Dairy Free Camo Chocolate Chip Muffins...with lots of spinach!


I call these camo muffins and not just because of the green and brown ingredients.  The healthiness is totally camouflaged by the yum!  You can be so sneaky about getting spinach in kiddos' (big grown up kiddos included) bellies with these little guys.

These will be perfect to make ahead and grab for a quick healthy breakfast before running off to school!


Camo Chocolate Chip Muffins

1 large ripe banana, mashed
1 egg, large
2 egg whites, large
½ cup yogurt (I used coconut milk vanilla)
2 tablespoons coconut oil, melted
1 teaspoon vanilla
1 cup ground oat flour*
1 teaspoon baking powder
¼ cup coconut sugar
¼ cup cocoa powder
⅓ cup chocolate chips (Enjoy Life)
2 handfuls of spinach
Place banana and yogurt in a your vitamix and puree until smooth. Then, add in 2 giant handfuls of spinach and blend again until smooth.  Transfer into a large bowl and add the rest of the wet ingredients. Mix with a wooden spoon until smooth. Next, add in dry ingredients and mix.  Spray your cupcake tins with coconut oil spray or use liners. Fill muffins about ¾ of the way full.  Bake at 350ΒΊF for about 20 minutes or until the center is fully cooked.

*Always make sure your oat flour is GF.  I don't react to certified gluten free oats, but I know some gutsy girls do.  If you try subbing a different GF flour let me know how it turns out!

Original recipe here.