Pages

Thursday, November 5, 2015

Pumpkin Pie Play Dough (GF & DF)

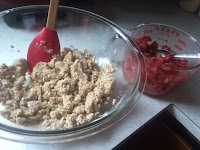
Mixing this up was a lot of good messy fun and the kids loved helping mix it up!  Smells delicious and it's GF & DF (not that it would taste very good, but just in case)!

Pumpkin Fun!

Pumpkin Pie Play Dough


1 Can of Pumpkin
Cornstarch
Pumpkin Pie Spice


Put the pumpkin in a large bowl.  Mix a generous amount of pumpkin pie spice in until it smells really yummy and is smooth!  Add the cornstarch.  Have the kiddos take turns helping mix it in.  Keep adding cornstarch until it gets to be a bit dry and crumbly.  At this point start kneading it with your hands and their little hands.  Do this and add in more cornstarch until you get the desired consistency.


They loved using pumpkin shaped cookie cutters to play with this!

Preschool Scientists... Pumpkin Guts Craft!

I shared in this post that my preschoolers learned how awesome pumpkins are!  One of the kiddos favorite parts was reading "Pumpkin Jack" and then seeing a pumpkin that grew at my house the same way the pumpkin in the book did!  Then we cut the pumpkin open and got to see, feel, smell, and even taste what was inside.


I wanted to tell you a little more about the craft we did to recreate pumpkin guts!


Pumpkin Guts Craft


Orange Construction Paper
Yellow Yarn
Pumpkin Seeds
Small Clear Plates (I found mine at Dollar Tree)
Scissors
Glue Sticks
Brown Construction Paper
Hot Glue and Hot Glue Gun


To prepare everything, first trace the plate onto the orange paper.  Cut out the needed number of circles.  Cut the yarn into long pieces.  Cut the brown paper into pumpkin stem shapes.


I set the cut open pumpkin on the table and called a couple of children over at a time.  I had them set the orange circle in front of them and cut the yarn into shorter pieces.  We need to work on our cutting skills and holding scissors the correct way so this was great practice.  Next I had them put glue in the middle of their circle and stick the yarn down.  This represented the fibrous strands inside our pumpkin.  I had them glue the brown stem sticking off the top.  Then we practiced our counting and counted out 11 seeds (our number of the week) and place them in the middle of the yarn.  I put hot glue all around the edge of the plate and carefully placed it onto the orange circle.


They loved that they made a pumpkin that they could see inside!


Adorable Mini Ghost Cupcakes! (GF, Vegan)

Sarah is my go to girl if I need a recipe for dessert!  Her flour blend works perfectly every time, and I've never made one of her recipes and been disappointed!


These adorable ghost cupcakes were no different.  Everyone loved them on Halloween night and no one could tell that they were gluten free AND vegan!


Don't judge the fact that mine don't look as perfect as Sarah's!
They got a bit messy in transit to the party!
They still tasted delicious and that's what matters!
She makes them as regular cupcakes and the recipe makes 12-14.  I needed to serve a lot more people so I did them in my "muffin barge" and made about 30 mini ghosts.


Adorable Mini Ghost Cupcakes (GF, Vegan)


chocolate cupcakes
  • 1 1/4 C Sarah's gluten free flour blend
  • 1/2 C good quality cocoa powder
  • 1 t baking powder
  • 1/2 t baking soda
  • 1/2 t sea salt
  • 1/2 C unsweetened coconut milk (So Delicious)
  • 1/2 C water
  • 1 T white vinegar
  • 1 C organic cane sugar
  • 1/3 C sunflower seed oil (I didn't have this so I used a canola coconut oil blend)
  • 1 t pure vanilla extract
vegan vanilla buttercream frosting
  • 1/2 C organic non-hydrogenated shortening
  • 2 T Earth Balance vegan butter, softened
  • 3 C organic powdered sugar, sifted
  • 2-3 T So Delicious coconut milk coffee creamer (I used regular)
  • 1 t pure vanilla extract
  • dairy free mini chocolate chips (Enjoy Life)
INSTRUCTIONS
  1. Preheat oven to 350 degrees. Spray your pan with coconut oil.
  2. Sift together flour blend, cocoa powder, baking powder, baking soda, and salt. Set aside.
  3. In large mixing bowl, stir together coconut milk, water and vinegar, until slightly curdled. Add sugar, oil, and vanilla extract. Slowly whisk in flour mixture. Mix for 1 minute, until combined.
  4. Pour batter into prepared cupcake pan. Bake for 12-15 minutes, or until toothpick inserted in center of cupcake comes out clean. Place cupcakes on cooling rack and cool completely.
  5. To make buttercream, beat together shortening and vegan butter for 1 minute in large stand mixer. Add sifted powdered sugar, 2 tablespoons coffee creamer and vanilla. Beat for 2 minutes, until light and fluffy (add additional tablespoon coffee creamer if needed).
  6. Place buttercream in plastic bag and cut off a bit at the tip. Pipe tall mound of frosting in center of cupcake, pulling tip away to create small peak. Add chocolate chips for eyes.


"Hey, I saw you in the movie!"
One of the kiddos from another school
thought I was the real Mrs. Incredible!

Preschool Scientists Making Blood!

My little preschoolers and I have been having a blast learning about what's inside our bodies this week!  Can't say I don't use that fancy Biology degree now can you!? ;)


We talked about how there are four parts of blood and what each parts' job is.  The concept was a bit over their heads, but they had fun making blood, especially because we made it out of candy!


Making Blood!


Empty mini plastic water bottles
Corn Syrup = Plasma
Mini Marshmallows = White Blood Cells
Sour Cherry Candies = Red Blood Cells
Chocolate Sprinkles = Platelets


I poured the corn syrup in each bottle so it was about half full.  I told them that this was the plasma and that the liquid part of blood isn't really red, it just looks red because of the red blood cells.  They thought that was super cool. 


Next I had each child count out 20 "red blood cells" and 10 "white blood cells".  I may or may not have let them sample the blood cells! ;)  This was great for practicing our counting both in English and Spanish.  It was also a great fine motor activity.  We learned that the job of red blood cells is to carry oxygen around our bodies and that the white ones help fight yucky germs!  I poured some platelets in each of their bottles and told them that these help stop bleeding when they get a cut. 


Finally we sealed up their bottles, nice and tight!  The kids loved shaking them up to mix the blood!  They were very intrigued by their bottles of blood and would have sat all morning moving them around and watching all the different parts!  They were so proud of their blood that we even had to go show other teachers and our school director what we made.  They were able to tell them what each part was called!  Hearing them say platelets was pretty funny!


One of the teacher's assistants in another room said to me "I bet there aren't many kids that can say they made blood in preschool."  I replied, "that's the point!" :)


Crispy Chicken Salad with Honey Sriracha Vinaigrette (GF, DF)

This is a super quick healthy meal for busy weeknights! 


Spicy Crispy Chicken Salad with Honey Sriracha Vinaigrette


Favorite greens- I love baby kale and spinach
Sliced carrots
Diced red onion
Diced sweet peppers
Slices cherry tomatoes
Sliced cucumbers
Whatever other veggies you have to throw on top!
Sliced chicken nuggets- we use G free from ALDI, delicious!
*Honey Sriracha Vinaigrette


*Honey Sriracha Vinaigrette

1/3 c apple cider vinegar
1/2 c EVOO
1/4 c honey
1 T sriracha 
Juice of 1/2 lemon
2 garlic cloves
1/4 t ginger
1 T mayo


Mix up your dressing in a hand blender and throw it in the fridge (it's best if it can hang out in the refrigerator for at least 30 minutes).  Get your chicken nuggets baking.  Slice and dice your veggies while you wait on the nuggets.  Fill your plates with a generous amount of greens.  Top with veggies.  Cut up the chicken nuggets and throw those in top.  Pour your dressing over top and enjoy!


Thursday, October 22, 2015

Pumpkin Muffins... Gluten Free & Vegan!

In preschool this week we learned how awesome pumpkins are!  We cut one open and got to see what it looked, felt, smelled, and even tasted like!


A mommy of one of my little food allergy buddies shared this recipe with me... and the kids all loved eating pumpkins because of it!


Making our pumpkin guts craft!

Pumpkin Muffins

2 C all-purpose GF flour
1 T baking powder
1/2 t baking soda
1 C sugar
1/2 t salt
1 t cinnamon
1/2 t nutmeg
1/2 t ginger
1/2 t allspice
1 1/4 C puréed pumpkin
1/2 C nondairy milk (I use coconut milk)
1/3 C coconut oil
2 T maple syrup


• Preheat the oven to 375°F and lightly grease a muffin pan.  • In a large bowl, mix the flour, baking powder, baking soda, sugar, salt, and spices.  • In a separate bowl, whisk together the pumpkin, nondairy milk, oil, and maple syrup.  • Pour the wet ingredients into the dry and mix.  • Spoon the batter into the muffin pan, filling each cup three-forths full.  • Bake for 25 to 30 minutes, or until a toothpick inserted in the center comes out clean.  • Remove from the oven. When they’ve cooled to room temperature, devour!


This recipe makes 12 muffins.  When I do it for the kiddos I do it in my "muffin barge" (that's what Mr. Kat calls it) and make 40+ mini muffins at a time.  Doing it this way I cut the baking time down to about 16-18 minutes.


It's Teal Pumpkin Time!


Halloween is right around the corner!  This is just a friendly reminder that that means it's Teal Pumpkin Time!


We are ready here at the Red Roof Inn, and at my Mama and Papa's house too!


Get all the info and downloads you need to get yourselves ready


My nutrition kiddos are learning about healthy Halloween treat options this week in nutrition, and that includes non food options too!


They get to color their own teal pumpkin poster too!


Click here for all the downloads.


Saturday, October 10, 2015

Slow Cooker Spaghetti Squash & Meatballs... Gluten & Dairy Free!

My friends, if you have never tried spaghetti squash let me be the one to tell you..... YOU ARE MISSING OUT!

No carbs and tastes just like spaghetti!  What's not to love.  The squash cooks perfectly in the slow cooker and these meatballs are fantastic.

Quick, easy, and healthy!  Yes, please!


Slow Cooker Spaghetti Squash & Meatballs
  • 1/4 C unsweetened almond milk
  • 3 eggs
  • 1 lb ground beef/turkey
  • 1 lb pork sausage
  • 1 C rice chex crumbs
  • 1/4 C nutritional yeast
  • 1/2 t pepper
  • 1/2 t garlic powder
  • 1 spaghetti squash- you don't want one so big it won't fit in your crockpot!
  • 6 C marinara sauce (or use 2 (24 oz) jars)
  1. In a large bowl, whisk together milk and eggs until combined. Add meats, crumbs, and seasonings.  Mix with your fingers until well combined.
  2. Heat broiler to high; place an oven rack about 4 to 5 inches from the broiler. Lightly grease a large baking sheet with cooking spray or oil. Using your hands, shape (about 40) 1 to 2-inch meatballs from the mixture; place on prepared baking sheets.
  3. Broil meatballs for 6 - 8 minutes, flipping halfway through, until browned.
  4. Clean your spaghetti squash and cut it in half.  Scoop the strings and seeds out and place the cut side down in your slow cooker.  Surround with the meatballs and pour the sauce over top.
  5. Cover and cook on low 4 to 5 hours in the slow cooker until meatballs are cooked through.
This makes A LOT of meatballs, which is exactly what I wanted.  They make for amazing leftovers!


Original recipe here.

Halloween Night Oil Blend

I have been busy making our home all sorts of spooky!

Among all my fun Halloween décor there is this one candle that I put out every year because it's cute, yet I never burn because, well, it's fake crap.  It inspired me to mix up an oil blend that got the house feeling even more festive!

Halloween Night Oil Blend

3 drops sweet orange oil
2 drops nutmeg
2 drops ginger
2 drops frankincense
1 drop vanilla

Put everything in your diffuser and enjoy!

This has an awesome spice aroma to it, yet the vanilla and orange sweeten it up to make it reminiscent of some Halloween treats!
Don't you love my cute vintage jack-o-lanters!?
They belonged to my Grandma's twin sister!

"Chemisting" with Essential Oils!

My degree says I'm a biologist, and I honestly despised chemistry (that could have been less to do with the actual subject and more to do with one certain professor).  However, essential oils actually make me want to play chemist!

I've never posted about my love (borderline obsession!) of oils because I hate to be the one doing what everyone else is doing.  When I finally got the courage to start this blog essential oils were just starting to gain mainstream popularity and now, well they are just "all the rage". I had been "chemisting" for years and didn't want to seem like I was trying to be too trendy now that it was the "in" thing to do.  I think wwwwaaaayyyy too much into things, I know!

In my effort to give less fucks about what people think of me I decided to just share my knowledge and talk about what I love.  So simple... Why overthink?!

So I'm going to be including some of the ways I use essential oils in my daily life in my upcoming posts.  

Now important reminder: I'm not an actually chemist (or oil expert)! Use my info at your own discretion.  Essential oils are real and natural and super beneficial for a lot of reasons, but they are still chemicals.  It is important to be using them safely and in the right amounts.  Some oils that are ok for me might not be ok for you, or you might have pets in your house that shouldn't be around certain oils, or your children might not tolerate some oils well.  So keep that in mind and do your own research using a reliable source (Wikipedia and Google don't count here).  Ask your doctor if you need to, although I can't guarantee how receptive/knowledgeable he/she might be about this.

Either way just have fun with it.  Play around (safely) and find what you like and what works for you!  And feel free to share when you find a super cool way to use oils or stumble upon an amazing blend!  

Enjoy "chemisting"!

"Really, you need more oils?!"


Thursday, September 24, 2015

Jalapeno Popper Fettuccini (GF & DF)

Bacon, jalapenos, AND pasta!  How can it be bad??


Jalapeno Popper Fettuccini


1/4 lb Fettuccine- I always use Tinkyada
1/4 C Earth Balance Buttery Sticks
1 small onion- chopped
2 garlic cloves- minced
2 jalapenos- chopped- removed seeds if you want
4 oz Daiya Chive & Onion Cream Cheese
1 C almond milk- I use extra creamy, unsweetened
1/2 C Daiya Mozzarella Shreds
2 T C Nutritional Yeast
1/2 C bacon- cooked crispy and crumbled


Cook pasta according to the directions.  While that's cooking melt butter in a large pan.  Sauté onion until soft and starting to brown (about 5 minutes).  Add garlic and jalapenos.  Cook about 30 seconds, until the garlic starts to brown.  Slowly whisk in the milk.  Add the cream cheese and stir until melted.  Boil for a couple minutes until it all starts to thicken a bit.  Stir in the cheddar, mozzarella, and nutritional yeast until smooth.  Stir in the bacon.  Once the pasta is done cooking drain it and add it to the sauce mixture.

Cajun Baked Swai (GF & DF)

This is a super easy dinner. 


Cajun Baked Swai


1 T Butter (Dairy Free)
1/2 C Buttermilk- (squeeze 1/2 lemon and add enough almond milk to get 1/2 C)
1 egg
8 Swai Fillets
EVOO
2 T Cajun Seasoning- I make my own
2 C "breadcrumbs"- I make these myself too... check it out here


Preheat your oven to 350.  Grease a 9 x 13 pan.  Coat the bottom of the pan with the butter.  In a shallow bowl mix the crumbs and the seasoning well.  Beat an egg in with your buttermilk.  Dip each fillet in the buttermilk mix.  Dredge in the crumbs mixture and place in the prepared pan.  Drizzle a little more oil over each fillet and sprinkle with remaining crumbs.  Bake for 12-15 minutes, until the fish is cooked through.


I like to make enough to have leftovers so we can make fish tacos the next night!


Original recipe here.


Cherry Tomato Pico

I had an abundance of cherry tomatoes and was making tacos... so naturally, this happened!


Cherry Tomato Pico


2 garden fresh jalapenos- seed them if you feel the need
1 small red onion- diced
juice of 1 lime
1 t sea salt
1 C sliced cherry tomatoes
1/4 C fresh cilantro- minced


Prep the onion and jalapeno and put them in a small bowl.  Sprinkle with the salt and then squeeze the lime over top.  Let that sit and allow the salt and lime to bring out the flavors of the onion and peppers while you slice the tomatoes and cilantro.  Add the sliced tomatoes and cilantro to the bowl.  Stir carefully and refrigerate until serving.


This easy healthy taco topper is full of garden fresh flavor!  You know me, I like it spicy... so I leave the seeds in my jalapenos!  Adjust the flavors to your liking.

Baked Onion Rings (GF, DF)

The kiddos and I celebrating the start of football season!

It's football season!!!  That means game day food!


Of course, we like to do it the healthy way around here...
I saw these in my Mama's Rachel Ray magazine and knew I had to try them.


Baked Onion Rings


1 Large Onion- I used red because that's what I had, but you can use white or yellow
*1 C "buttermilk"
1 egg
1/2 C brown rice flour
1 C "bread crumbs"- see how I do this here
1/2 t cayenne pepper
1/2 t black pepper
1/2 t onion powder
1/4 t sea salt


*squeeze half a lemon in a measuring cup and add enough unsweetened almond milk to make it a cup.  Let it sit while you get everything else prepared.


Prepare your buttermilk.  Preheat the oven to 475 and prep a large baking sheet with parchment paper.  Put the brown rice flour in a shallow bowl.   Mix the breadcrumbs with all the seasonings in another shallow bowl.  Beat the egg in with your buttermilk in the measuring cup.  Slice the onion into rings (about 1/2 in thickness) and separate them.  Coat each ring with flour first, then dip it in the buttermilk mixture.  Let the excess liquid drip off before dredging it in the crumb mixture.  Make sure it is coated in the crumbs and place on the baking sheet.  Continue for each ring, making sure to have them in a single layer on the baking sheet.   Bake until crispy and brown, about 18 minutes.  Sprinkle with a little sea salt.  Serve with whatever sauce you like.


Thursday, September 10, 2015

Blueberry Salsa

Mama loves blueberries!  She found and requested this recipe.


I know, it sounds weird...


But don't knock it til you try it!


Blueberry Salsa


1 1/2 C fresh blueberries
1/4 C sweet red pepper- chopped
1/2 red onion- finely chopped\
2 T minced seeded jalapenos- leave the seeds in if you want a kick
2 T fresh lemon juice
2 T fresh minced cilantro
1 1/2 t sugar
1/4 t sea salt
dash of pepper


Pulse the blueberries in your food processor just a bit (about 5 times) until they are coarsely chopped and a bit juicy.  Transfer to a small bowl.  Add everything else and stir it up.  Refrigerate until serving.


Serve this with sweet potato tortilla chips!  Yum!

Thursday, September 3, 2015

Authentic Roasted Salsa


It's that time of year again that we have way too many tomatoes and jalapenos!  My friend who bought a house down the road from us has a giant salsa garden too and she keeps trying to share even more fresh produce with us.


I love a good fresh salsa, but sometimes it can be watery if you just throw cherry tomatoes in the blender whole, and lets face it, getting the skin off the bigger tomatoes makes a huge mess!


I've been learning about making all kinds of real authentic Mexican food from my new neighbor and I love it!  I swear I eat so much Mexican food that I really should be Mexican! 


She told me that I NEEDED to roast the veges.... that's the only way they do it in Mexico.  I've never done this before making salsa..... I don't know why the hell not!  It's so easy and the result is delicious!


Image result for authentic oven roasted salsa

Authentic Roasted Salsa


There's really no science to this... just throw in what you got and make it suit your tastes


2 large onions- peeled and halved
8-10 jalapenos- seeded and halved
(I did add one crazy yellow pepper from Ana's garden- we have no idea what kind it is, but it is spicy even to me... and her!)
1 garlic bulb- cloves peeled and halved
20-30 garden fresh tomatoes- depending on the size- just cut on each side of the core- no need to peel
1 bunch of fresh cilantro
salt & pepper to taste
1 T apple cider vinegar
1 T honey
Squirt of fresh lime juice


Preheat your oven to 375.  Grease a cookie sheet a little.   Place the tomatoes, peppers, onions, and garlic with the cut side up on your sheet and throw it in the oven.  Let it roast until the peppers look a bit charred and the tomatoes and onions look like they have softened.  I took them out after about 45 minutes.  Let everything cool a bit and then just throw it all in your blender.  Add the fresh cilantro and any seasonings you like.  I just use a squirt of honey, fresh lime juice, about a tablespoon of apple cider vinegar and a bit of salt and pepper.  Let it puree until you get your desired consistency.  That's it.  The hardest part is waiting for the veges to roast!  It smells so amazing it makes you very impatient! :)


Next up I'll tell you what I do with all those tomatillos! :)


Green Hulk Muffins (GF, DF, Egg Free, Peanut Free)

My old preschool closed. :(


I was super bummed about it and thinking I wouldn't have any little people in my life anymore on a daily basis... you know unless I created my own (which would make my mama very happy).


Mr. Kat asked me if I could do anything what would it be.  After I considered owning a car museum or custom car shop I decided to think of something a little more realistic. :)  I said I want to teach kids about nutrition!  I didn't know how to make it happen and was just planning on hanging out for a while until I decided what to do.


One of my friends got a job at a preschool and they asked her if she knew any preschool teachers looking for a job.... she gave them my name and the rest is history!


I didn't find it, it found me!  I wasn't even sure about it to begin with.  But the part of my resume that the director latched onto was the part about my interest in nutrition.  They wanted to add nutrition as part of their enrichment program.....Totally meant to be!  I have my own three year old class and then in the afternoons I go to all of the other classrooms and teach them about nutrition!  And I absolutely love it!


God won't close one door without knowing for sure that there is another one waiting for you.


I made these muffins as part of my Fruit and Vegetable Fill Up week and the kids are still talking about them!  I sent the recipe home and kids have made their big people get all the ingredients so they could make them.  The other teachers are even making them at home too.  My favorite part about these is one of our little guys that has severe food allergies got to have them too!  After not being able to participate in so many snacks and parties at school that involve food his face just lit up when I told him that I talked to his Mommy and that he could eat these muffins!  Thanks Green Hulk!! :)


Green Hulk Muffins


  • 2 C Gluten Free All Purpose Flour (Sarah's Blend)
  • ¾ cup sugar
  • 2 tsp baking powder
  • ½ tsp baking soda
  • 1½ tsp ground cinnamon
  • ½ tsp salt
  • ¼ cup coconut oil
  • ¾ cup coconut milk
  • 1 (6 ounce) bag fresh baby spinach
  • ½ cup mashed banana (from about 1 to 2 bananas)
  • 2 tsp pure vanilla extract


  • Preheat oven to 350°F and prepare your muffin pans with paper liners or oil.  Whisk together dry ingredients in a large bowl: flour, sugar, baking powder, baking soda, cinnamon, and salt. Set aside.  In a blender, place everything else and blend until completely puréed.  Pour puréed mixture into dry mixture and fold together with a rubber spatula until completely combined.  Fill muffin cups about ⅔ full and bake 18-20 minutes or until a toothpick inserted into the center comes out clean.

    I used my "muffin barge" as Mr. Kat calls it.
    The kids love the little bite sized muffins!
    They kept asking for more


    I told the kids that they were green because the Hulk helped me make them!  They couldn't believe that they ate spinach! Sneaky Miss Kat! :)


    A few of the 4 year old boys loving Green Hulk Muffins
    and getting greens in their bellies!


    The original recipe is here.


    Thursday, July 23, 2015

    Chicken Fajita Pasta (GF & DF)

    We love anything Fajita!  I don't know why I didn't think of this one myself..


    Chicken Fajita Pasta
     
    This pic is from the original recipe...
    mine picture didn't do this dish justice!


    Ingredients
    • 2 T olive oil
    • 1 pound boneless, skinless chicken breasts- cut into bite size pieces
    • 3 T taco/fajita seasoning- I always use homemade!
    • 1 onion- diced
    • 2 bell peppers- sliced
    • 4 cloves garlic- minced
    • 1 C mushrooms- sliced
    • 2- 3 C low-sodium chicken broth- this kinda depends on what pasta you choose
    • ½ C dairy free "heavy cream"*
    • 1 (10-oz) can Ro-Tel
    • 8 oz of your fave GF pasta
    • ½ t sea salt
    Instructions


         *To make the heavy cream I soak a cup of cashews in water in my vitamix for at least 2 hours.  Drain the water and slowly add almond milk as you blend it until you reach the desired consistency.
    1. Cut the chicken.  Season with half of the seasoning. In a 12-inch skillet, heat 1 tablespoon olive oil over high heat. When the oil is very hot, carefully add the chicken in a single layer and cook without stirring until one side is seared and browned, about 1-2 minutes. Flip the chicken to the other side and cook until browned. Remove the chicken to a plate and set aside.
    2. Add the remaining 1 tablespoon of olive oil to the skillet with the heat still on high. When the oil is very hot again, add the onions, bell peppers, mushrooms and remaining taco seasoning. Cook, stirring occasionally, until the veggies are slightly blackened. Turn heat to low, add minced garlic, and stir until fragrant and well combined, about 30 seconds. Remove the veggies to the plate with the chicken.
    3. In the same skillet, add the broth, cream, diced tomatoes, uncooked pasta, and salt. Stir to combine and bring to a boil, then cover, reduce heat to medium-low, and cook for 10 minutes, check at this point and add a more liquid if you need to (GF pasta tends to soak up every bit of liquid)  cook another 5 minutes or until pasta is tender and liquid is mostly absorbed. Add the chicken and veggies back into the skillet and stir to combine until heated through, about 2 minutes.
    Find the original recipe here.

    Thursday, July 9, 2015

    Garden Fresh Salsa

    The garden at the Red Roof Inn is pretty much just a salsa/mojito/bruschetta garden!  Tomatillos (I'll share my recipe for salsa verde!), tomatoes, jalapenos, cilantro, onion.... of course the fresh mint and basil too!


    I picked my first jalapeno this past weekend....So, naturally I made salsa!!


    This is a really easy salsa that tastes so fresh and is so quick to whip up.


    Garden Fresh Salsa


    4 Fresh Tomatoes- fresh from the garden is best, but none of mine are ready yet
    1 jalapeno- I like it hot so I throw the seeds in too
    1 red onion
    juice of 1 lime
    3 garlic cloves
    one big handful of fresh picked cilantro
    splash of apple cider vinegar
    1 can Rotel
    1/4 C ketchup- make sure it's GF of course- I use Heinz Organic
    dash of cumin
    salt & pepper to taste


    Cut the veges up a bit and throw everything in the blender.  Blend until you get your desired consistency.


    As you can see there really is no science to this.  Just throw shit in the blender and hit go!


    The entire jar was gone by the end of the day!


    Thursday, July 2, 2015

    Fresh Fruit Crumb Bars (GF, DF, & Vegan)


    I have come to the conclusion that this is the only crumb bar recipe I will ever need!


    Which leads me to believe Sarah's blog is the only one I will ever need to refer to for  desserts. Ever. Again!


    You can find her blog here, and the original recipe for these bars specifically here!  I tried them the first time with strawberries because my strawberry patch was so full of berries.  We loved them so much that now I love to mix it up and try them with all kinds of different fresh fruits!


    Fresh Fruit Crumb Bars


    Filling:


    2 C diced fresh fruit
    1/4 C cane sugar
    2 T pure maple syrup
    2 T corn starch


    Crumb/Crust:


    1 C GF all purpose flour blend
    1 C GF oats
    1/4 C almond
    1/4 C brown sugar
    1/4 C cane sugar
    1/4 t sea salt
    5 T SOLID coconut oil
    2 T unsweetened coconut milk
    2 T pure maple syrup


    Preheat oven to 375 degrees. Prepare 8x8-inch baking pan with parchment paper/cooking spray.  Dice your fresh fruit and put it in a medium bowl.  Carefully mix in the remaining filling ingredients and set aside. 


    Sift together the flours, oats, sugars and salt. Add coconut oil and blend with fork until ingredients are well mixed. Pour in maple syrup and coconut milk. Stir until just combined and kinda crumbly.

    Spread 2/3 of oat mixture into your pan and press down evenly. Pour your filling mixture over top.  Sprinkle remaining crumb mixture over the filling. Bake for about 45 minutes or until strawberries are bubbly and the crumbs are golden brown. Allow to cool in pan. Slice and serve.


    The perfect start to my morning! :)

    Blueberry!


    Tuesday, June 23, 2015

    Lemon Poppyseed Banana Loaf (GF & DF)

    I love banana bread and lemon anything... why not make both?!


    Lemon Poppyseed Banana Loaf


    2/3 C butter- softened (I use Earth Balance sticks)
    1 C sugar
    2 eggs
    3 very ripe bananas- mashed
    6 T FRESH lemon juice
    2 C GF all-purpose flour blend (I use Sarah's)
    1 t baking soda
    1 t vanilla
    1 t salt
    2 T poppyseeds
    zest from one whole lemon


    Preheat oven to 375.  Grease a 9x5x3 loaf pan.  Cream the butter and the sugar together.  Add the banana and mix.  Beat in 1 egg at a time.  Add the lemon juice, flour, baking soda, vanilla, salt, seeds, and lemon zest.  Scrape the  batter into the pan.  Bake for 1 hour, or until a toothpick says it's done.  Cool before devouring!


    Original recipe is from Something Swanky (what a fun name!)


    BLTs NEED Chipotle Mayo!


    I love BLTs!  Mostly because of Chipotle Mayo!!


    So easy and soooo worth it!!


    Chipotle Mayo


    3/4 C mayo (make sure it's GF & DF!)
    1 chipotle pepper with 1 T adobe sauce
    1/8 t garlic powder
    1 t lime juice


    Mix it all up with a hand blender. Store it in a cute squatty mason jar!

    Bruschetta Dip


    Image result for basil plant
    Happy basil plants!


    Bruschetta Dip


    6 Garden Fresh Tomatoes
    1 Red Onion
    1 Handful Fresh Basil
    1 t Italian Seasoning
    1 T Nutritional Yeast
    1/4 C Italian Dressing (Make your own, or make sure it's GF & DF)


    Chop up your tomatoes, onion, and basil.  Throw everything together and let is marinate a bit before serving. 


    Fresh & colorful!


    I love to serve this with these guys!